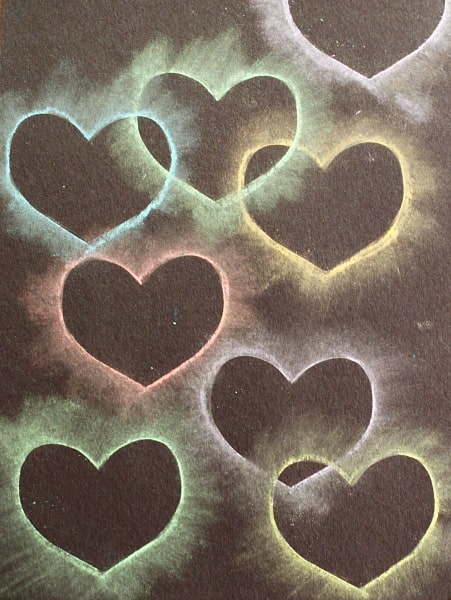
Japanese Notan Design Collage
Positive and Negative Space
Positive and Negative Space

Fourth grade students are being introduced to the idea of positive space shapes and negative space shapes in artworks using the Japanese design idea of Notan. Positive space is when an artist looks at and creates an image of the object. Negative space is looking at and creating an image of the empty spaces around an object. Students will begin by creating positive-negative collages in the Notan style.
Try one of the options below at home to earn bonus points toward your art grade.
Option 1: View the Power Point we viewed in class together as a family. Students should be able to explain each slide. Answer at least two of the questions from the Power Point. Please write both the question and the answer. Do not forget to include your name and class number. Submit your answers on paper to Mrs. Wine in class.
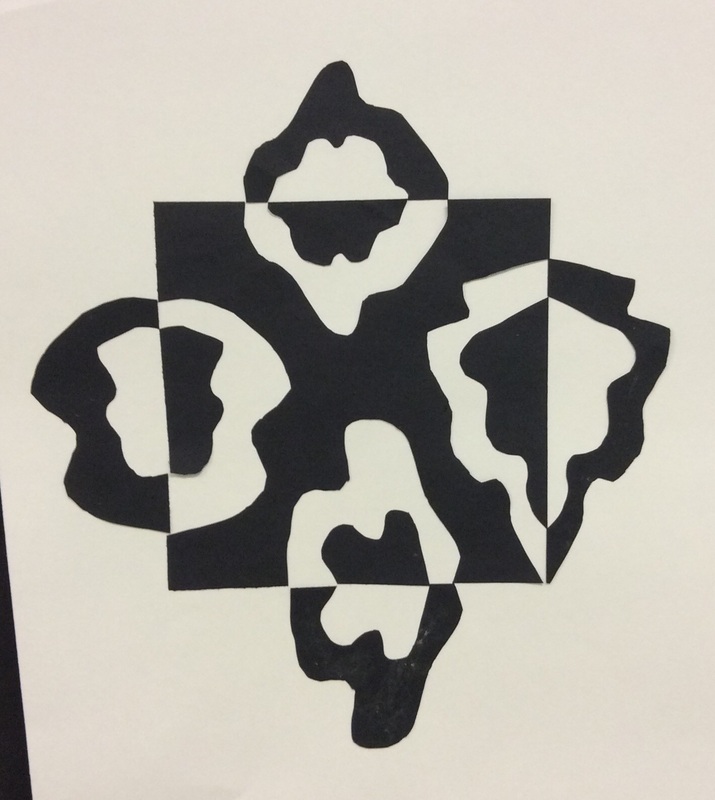
Option 2: Create a Notan collage design using a different starting shape. In class we began with a square and cut shapes from each side. Try starting with a triangle, circle, heart, or even a pentagon or star. Cut shapes, flip them, then glue them down. Place your name and class on the back of the collage and submit it to Mrs. Wine in class.


Option 3: Try making your own negative space drawing. Look at a tree, a plant, a chair, or anything else. Look at the shapes around the object and the holes inside the object. Draw the negative space as well as you can on unlined paper. (Copy paper is fine.) Color the negative space in with a pencil, a crayon, or a marker. Do not forget to put your name and class on the back. Submit your drawing to Mrs. Wine in class to earn bonus points.
Option 3: Try making your own negative space drawing. Look at a tree, a plant, a chair, or anything else. Look at the shapes around the object and the holes inside the object. Draw the negative space as well as you can on unlined paper. (Copy paper is fine.) Color the negative space in with a pencil, a crayon, or a marker. Do not forget to put your name and class on the back. Submit your drawing to Mrs. Wine in class to earn bonus points.

PREVIOUS YEARS:
Hello Families!! This page will have the same activities I posted on my Google classroom page in addition to descriptions of activities we would have actually done in art class. I will post a new activity each week, but there will be extra "enrichment" ideas below as well. Please make sure you find the project for YOUR CLASS!! (There are 2 different 4th grade projects here!) If you have any questions, please reach out to me via my school email at ewine@schools.nyc.gov
Classes 4-303 and 4-305 Scroll DownCubist Drawings and Paintings
Class 4-313

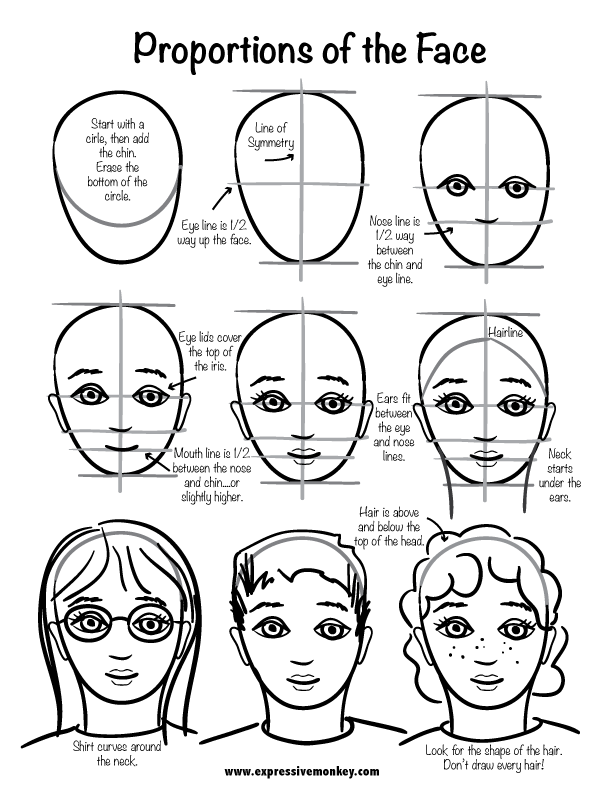
Week of March 30: Begin your Cubist self portrait. Get a piece of white drawing paper and a pencil. Divide your paper into different sections with straight lines or simple shapes. Draw your face in a Cubist style. Fragment the face along the dividing lines. Show different facial features from different angles. Look at the photo below and watch the YouTube video I made to see examples.

Your work is not due until next week, but you can email me a photo for feedback if you want. Send photos to ewine@schools.nyc.gov
Week of March 23: Review what we learned in class about Pablo Picasso and how other artists were influenced by Picasso and by Cubism.
1. Read the Information from the project handout and look at the images and information on the Power Point.
Write a paragraph that explains what your learned about Picasso and Cubism. You may write your paragraph on a Google Doc and send it to Mrs. Wine or write it on loose leaf and have a parent help you take a photo of it (with a smartphone). Work should be emailed to Mrs. Wine at ewine@schools.nyc.gov
Above all, stay safe, have fun, and see you next week.
In Class Activities and Enrichment:
Fourth grade students are learning how artists are inspired by both the world around them and by the work of other artists by studying the development of Cubism. Students began by looking at Cubist works with their table group and developing questions about the work. Then students read about the artists Pablo Picasso, Juan Gris, and Roy Lichtenstein. Students examined a power point and looked at examples from these artists, as well as from other professional and student artists. Students will be creating their own Cubist style self-portraits (class 4-307) or still life drawings (classes 4-302 and 4-303). Students will focus on fragmenting their faces or objects and adding textured patterns to parts of their work. Then students will choose a color scheme and add areas of blended color with Portfolio Pastels
and water.


Try one of the options below at home to earn bonus points toward your art grade.
Option 1: View the Power Point we viewed in class together as a family. Students should be able to explain each slide. Answer at least two of the questions from the Power Point. Please write both the question and the answer. Do not forget to include your name and class number. Submit your answers on paper to Mrs. Wine in class.
Cubist Still Lifes
Option 2: Some people think that abstract artists are not able to create art in a realistic style. This is often untrue. Many Cubist and abstract artists are very well trained and perfectly capable of working in a realistic style. They CHOOSE to work abstractly. Working in a realistic style is a great way to study an object and practice your skills. Practice drawing a realistic self portrait or realistic still life. Use pencil, colored pencil, or any media of your choice. Place your name and class on the back of the drawing and submit to Mrs. Wine.
Option 3: Picasso Inspired Cartoon Sketches
Watch this YouTube video on sketching in Picasso's style. Explore making your own Picasso style sketches. Sketch several portraits on one page. Use color to create lines or to color areas in. Use any medium of your choice: pencil, marker, colored pencil, or crayons. Write your name and class on the back of the sketches and submit them to Mrs. Wine.
Stencil Printing
Classes 4-303 and 4-305

Week of April 6: This week you will create your own artwork using stencils. You will need a sheet of paper to make a stencil with. I bet you can find some thick paper from a recycled box like a cereal box.
1. Watch the YouTube video i made. I will demonstrate two ideas you can try with your stencil.
2. Use your stencil to create your own artwork. Repeat the stencil many times to FILL THE PAGE. You can try ideas from the video or invent your own ideas. Use any material you want such as crayon, marker, colored pencil, chalk, or even paint.
3 Take a photo of your work and email it to me at ellen.wine@ps.150q.org
Week of March 30: Shepard Fairey is also known for his graffiti art. This week you will create your name or a word that describes you in graffiti style.
1. Watch the two YouTube videos.
2. You can also use this for ideas. Experiment with some ideas.
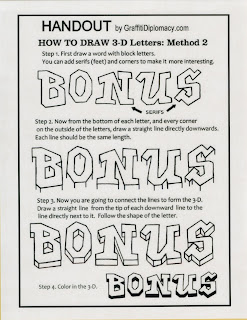
3. Write your name or a word that inspired you It can be black and white or you can add color. Take a photo and send your graffiti word to me at ewine@schools.nyc.gov
Week of March 23: Review what we learned in class about the contemporary American artist Shepard Fairey.
1. Read the handout we discussed in class. Look at the images and information about Shepard Fairey on the class Power Point.
In Class Activities and Enrichment
Students looked at the art of contemporary artist Shepard Fairey. They read about his life and observed how he uses visual symbols to represent his views and ideas. Students are creating a simple symbol to represent something about themselves or their views. Students will create a stencil of this symbol and use it to create stencil prints using two different colors. Look below for extra credit and learning extension opportunities to complete with this unit.
1. Watch the YouTube video i made. I will demonstrate two ideas you can try with your stencil.
2. Use your stencil to create your own artwork. Repeat the stencil many times to FILL THE PAGE. You can try ideas from the video or invent your own ideas. Use any material you want such as crayon, marker, colored pencil, chalk, or even paint.
3 Take a photo of your work and email it to me at ellen.wine@ps.150q.org
Week of March 30: Shepard Fairey is also known for his graffiti art. This week you will create your name or a word that describes you in graffiti style.
1. Watch the two YouTube videos.

3. Write your name or a word that inspired you It can be black and white or you can add color. Take a photo and send your graffiti word to me at ewine@schools.nyc.gov
Week of March 23: Review what we learned in class about the contemporary American artist Shepard Fairey.
1. Read the handout we discussed in class. Look at the images and information about Shepard Fairey on the class Power Point.
Write a paragraph that describes what your learned about Shepard Fairey. Be sure to include how he used symbols to help express his ideas in his work. You may write your paragraph on a Google Doc and send it to Mrs. Wine or write it on loose leaf and have a parent help you take a photo of it (with a smartphone). Work should be emailed to Mrs. Wine at ewine@schools.nyc.gov
Above all, stay safe, have fun, and see you next week.
In Class Activities and Enrichment
Students looked at the art of contemporary artist Shepard Fairey. They read about his life and observed how he uses visual symbols to represent his views and ideas. Students are creating a simple symbol to represent something about themselves or their views. Students will create a stencil of this symbol and use it to create stencil prints using two different colors. Look below for extra credit and learning extension opportunities to complete with this unit.
Option 1: Look at Shepard Fairey Power Point
View the Power Point presentation we discussed in class. Answer one of the questions from the Power Point slide in a complete paragraph. Bring your response to Mrs. Wine and make sure your name and class in on your response.
Shepard Fairey Power Point
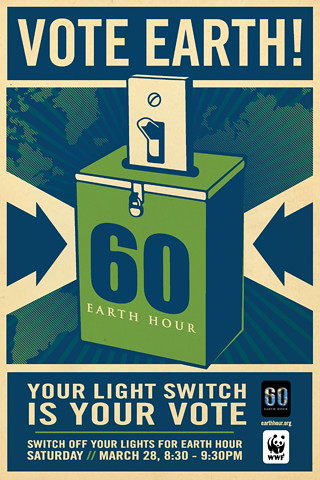
Option 2: Create a Poster Design
Shepard Fairey is very politically and socially active with his artwork. Create a design for a poster about a political issue or a social issue that is important to you. Limit yourself to only 2 - 3 colors in your design. Think about how you could use symbols in your design to help you communicate your message.
Option 3: Create a Stencil and Use It in an Artwork
Create a stencil of any basic shape you want. Use this stencil in an artwork. Think about how repeating this stencil shape in your artwork helps to create a sense of unity.
Option 4: Watch this video that shows Shepard Fairey using huge stencils to create a mural in San Diego, California.
Draw your own design for a mural. Think about how you could use patterns for a background like Fairey did in this mural. What kind of symbols could you use in a mural design to communicate a message to people. Limit yourself to 3 or 4 colors for your mural, and think about what message these colors will communicate to the public. Write your name and class on the back of your mural design and turn it in to Mrs. Wine. You could also take a photo (with a smartphone) and email your mural design to Mrs. Wine at ewine@schools.nyc.gov
Students in fourth grade classes are studying American painter Stuart Davis. They observed a variety of his paintings and discovered how he used brightly contrasting colors and lettering to create a unique style of painting.
Students are creating collages that are inspired by Davis's paintings. Each student begins by selecting 2 complementary colors, one additional color, and black and white paper. Students cut large and medium shapes and arrange them to fill and balance their page. Students will then add 2 adjectives that describe themselves by cutting the words in block or bubble letters from their paper. Finally, small shapes will be added to fill and balance the page.
Look below for extra credit opportunities:
Option 1: Review the class Power Point
Click the link below to review the Power Point we viewed in class. Answer 2 of the questions from the Power Point presentation on loose leaf paper. Write the question and your response. Place your name and at the top of the paper. Turn the paper into Mrs. Wine the next time you come to art class.
Option 2: Create an original artwork that uses lettering.
Write your name or another word in block or bubble letters. Make the letters large enough to fill the page. Use the elements of line and shape to create a unique design in each letter. You may add color to the artwork or just leave it black and white.
Color Scheme Painting
Classes 4-302 and 4-307
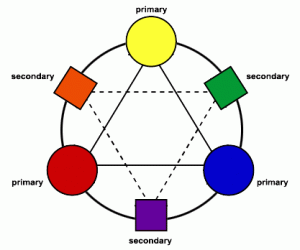
Fourth grade students are learning about different color schemes in a painting project. Students will create a balanced composition by creating and tracing a leaf stencil. All students will create their own color wheel to use as a reference by painting primary and mixing then painting secondary colors. Students will choose their own color scheme, either monochromatic, complementary, or analogous and will choose the colors within that color scheme for their painting.
Follow along with our daily lessons by viewing this Power Point to see what students are learning and doing in class.
Tempera Painting Daily Lessons
Follow along with our daily lessons by viewing this Power Point to see what students are learning and doing in class.
Tempera Painting Daily Lessons
Look below for home link options to do together. Students will earn extra credit for each option they complete and hand in.
Home LInk Option 1: View the power point presentation we looked at in class.
Color Scheme Introduction Power Point
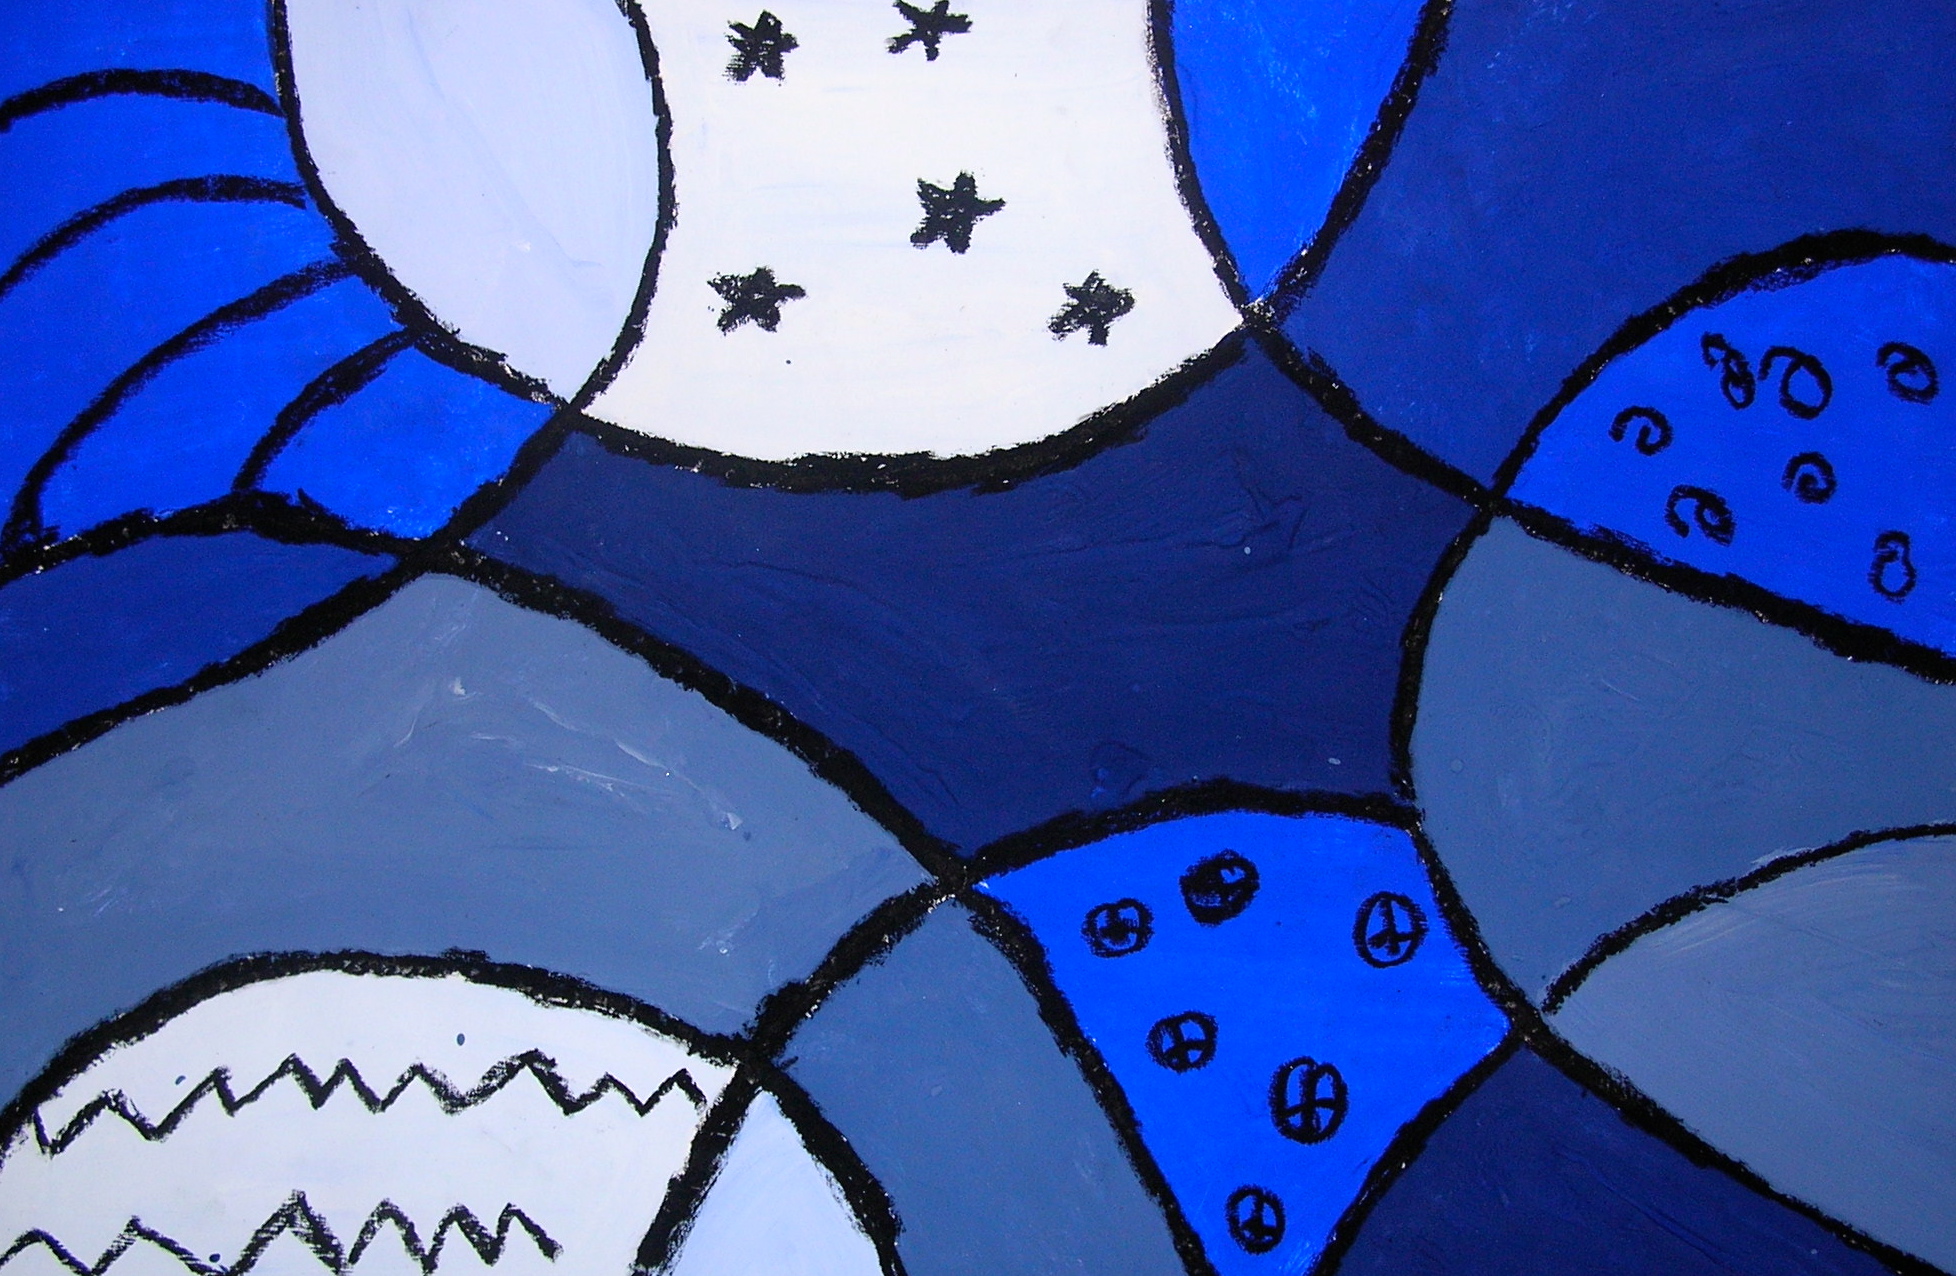
Home LInk Option 2: Look at the three color scheme paintings below from the Power Point slides. Each painting is by an art master! Which painting do you like the best and why? Write your response in a complete paragraph. Include art vocabulary in your response, especially information about the main color scheme the artist used. How do you think the artist's use of color helped express a mood or feeling in their painting?

The Old Guitarist by Pablo Picasso (mostly monochromatic)
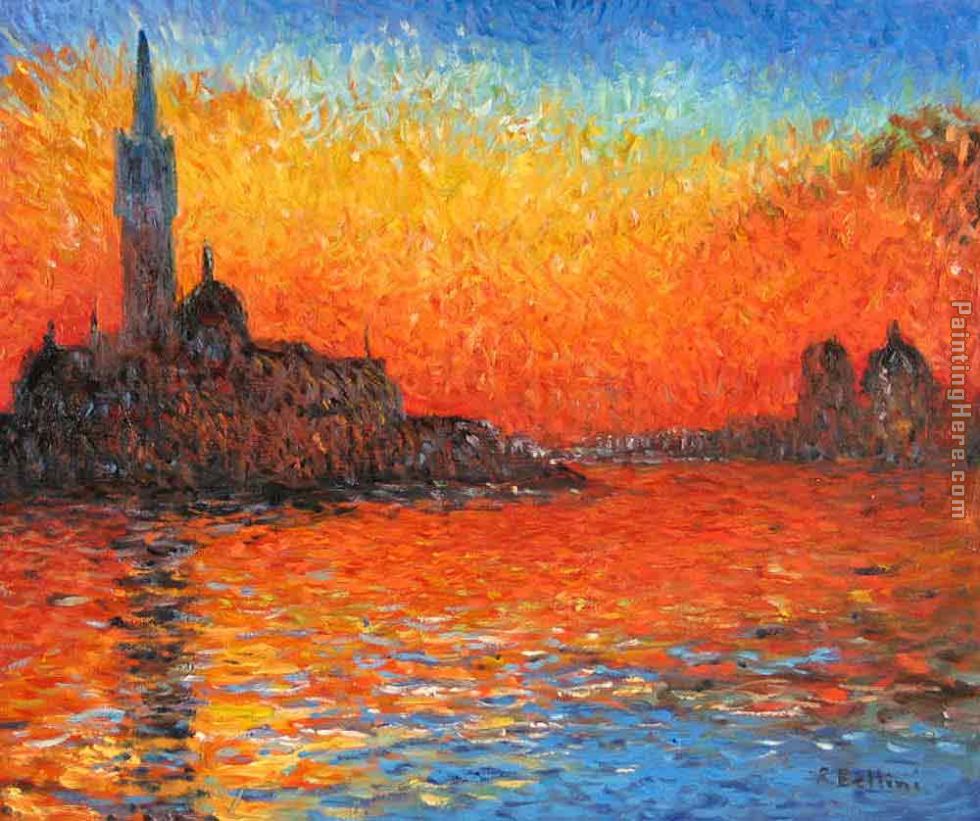
Venice Twilight by Claude Monet (mostly complementary)

A House in the Provence by Paul Cezanne (mostly analogous)
Home Link Option 3:
Create your own artwork at home using either a monochromatic, complementary, or analogous color scheme. You may use any medium for your artwork; it may be a drawing, painting, or a collage. It may represent something, be abstract, or be simply a non-objective design. Place your name a class on the back of your artwork and give it to Mrs. Wine during your next art class.
Monochromatic (Blues)
Complementary (Violet and Yellow)

Analogous (Blue, Green and Yellow)

Leaf Drawing
Class 4-301


Class 4-301
Fourth grade students will extend their study of positive and negative shapes while looking at autumn leaves. Students will view images of leaves and discuss what they know from science class about why the leaves change colors in the fall. They will also describe leaves using the elements of art (line, shape, and color). Students will create their own unique leaf stencils by drawing from observation. Then students will use these stencils to "push" the pigment from oil pastels into the positive space shapes and negative space shapes of the paper. Students will add contour lines to show details by drawing from observation and will add one color to the negative space background. Select an option below to extend your knowledge and earn extra credit in art class.

Option 1: Click below to view the Power Point presentation we looked at in class. Explain what you remember about leaves from science and art class to someone at home. Answer one of the questions from the Power Point slide in a paragraph. Make sure you are practicing using your art vocabulary. Place your name and class on the sheet and make sure you write the question. You may give your response to Mrs. Wine in class or email it to her at ewine@schools.nyc.gov
Option 2: Create an artistic leaf rubbing.
Watch this two-minute video to see how this artist used real leave to create a leaf rubbing.
Collect some interesting leaves. Try to collect leaves with a variety of different shapes. Press them in a book for 3 - 4 days so that they will be flat. Place the leaves under a white sheet of copy paper with the veins of the leaf facing you. Use crayons in fall colors to rub over the paper. The texture and design of the veins of the leaf should show up on the paper. Add some extra lines to make your artwork interesting. Remember that neatness always counts!!!! Place your name and class on the back of your artwork and bring it in to Mrs. Wine to earn extra credit points.

Option 3: Georgia O'Keeffe Inspired Work
Watch this video about the American artist Georgia O'Keeffe (which is about 4 minutes long). After watching the video, you may either write a paragraph on loose leaf that explains something you learned about Georgia O'Keeffe's life. Or you may make an artwork of your own inspired by her style. Remember that Georgia O'Keeffe liked to zoom in on details of objects such as flowers and leaves. She looked at the world around her such as the New York City skyscrapers or the mountains of New Mexico and painted them in an abstract way. Place your name and class on the back of your work and bring it to Mrs. Wine for extra credit.
Art Expo Fourth Grade


Sculpture:
Iroquois Inspired Masks

Fourth grade students reviewed what they had studied earlier this year about the Iroquois nations in upstate New York. Students looked at examples of masks from the False-Face Society of Iroquois nations. They read about how these masks were made and learned what purpose they served. Students created sketches for their masks and included a written description. Students will be creating miniature masks inspired by the Iroquois culture from self-hardening clay. Students will paint masks and include hair. Look below to learn more about the false-face masks of the Iroquois.
No comments:
Post a Comment