Keith Haring Drawing Project
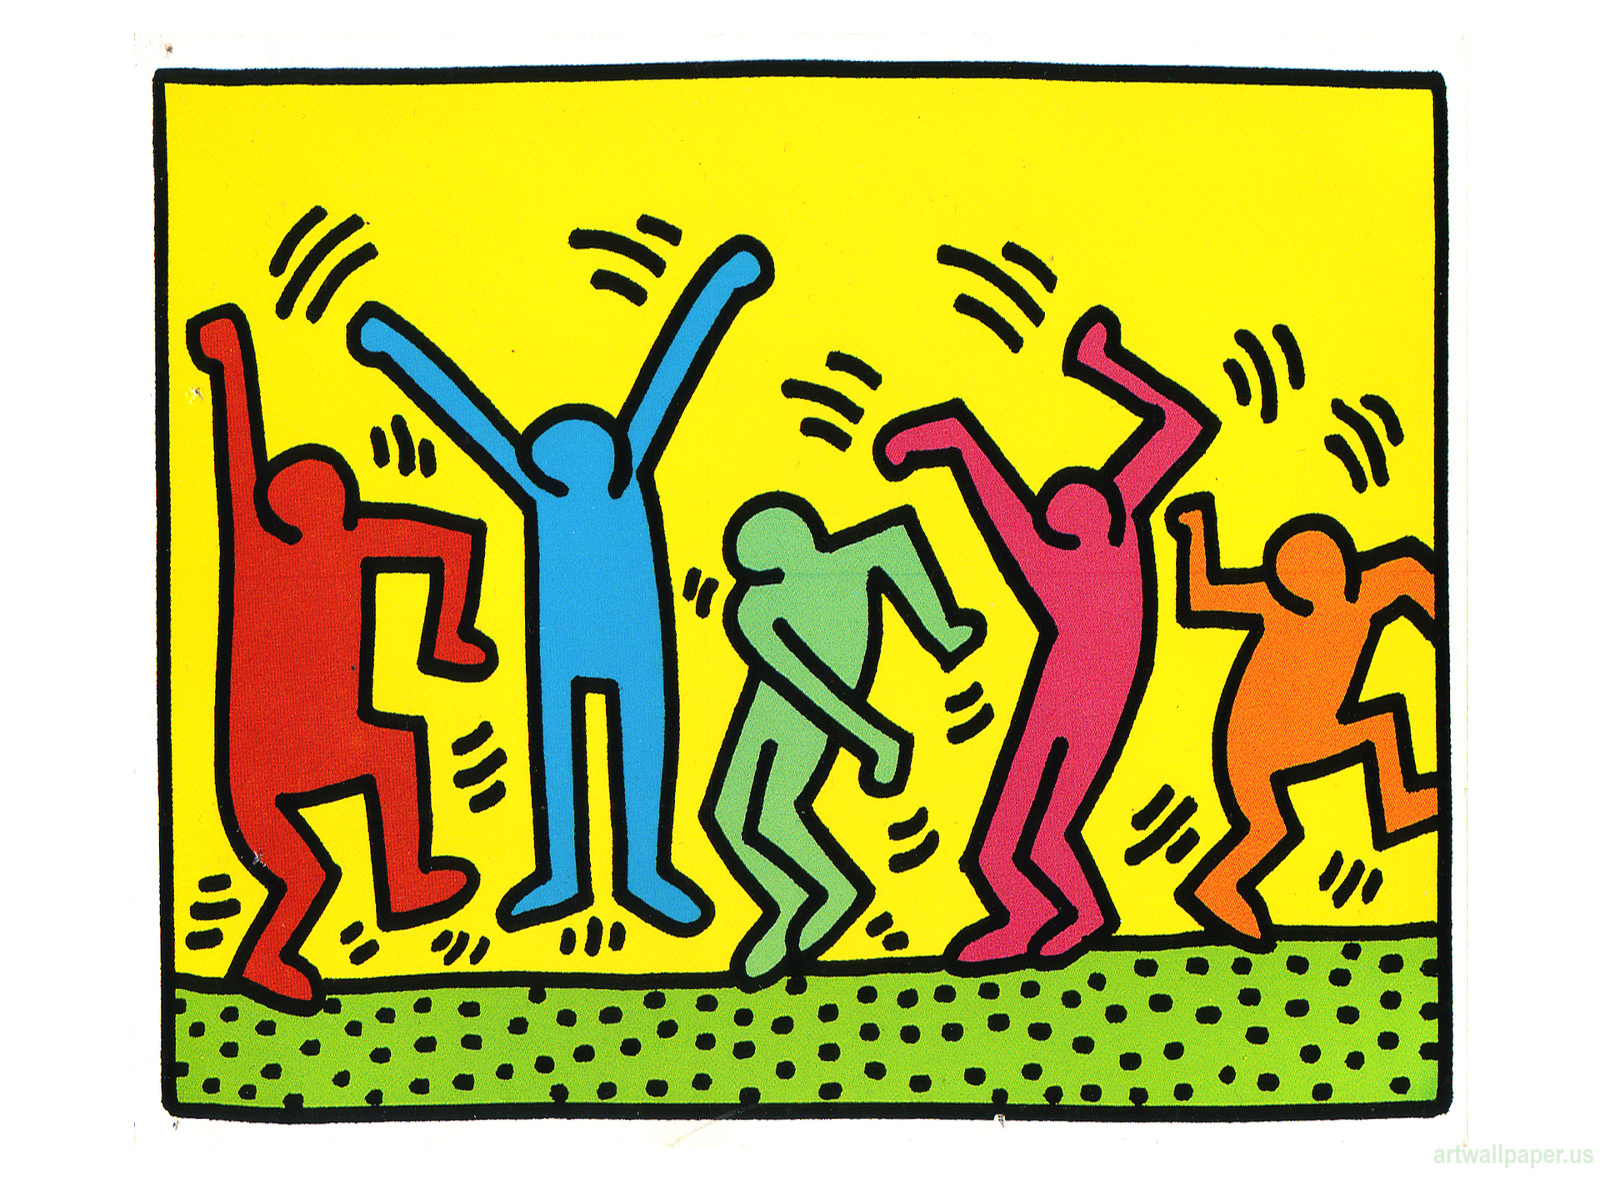
Second grade students are studying the art of American artist Keith Haring. Students will examine the art of Keith Haring to discover what his art looks like. Then each student will create an original drawing in the style of Keith Haring using markers. Drawings will include one or more figures in action, a symbol to express a feeling and a border with patterns.
Choose an option below to explore more about Keith Haring. Complete the activity and give it to Mrs. Wine to earn bonus points toward your art grade!!!
Option 1 Class Power Point Review: View the Power Point using the link below to review what we learned in class. Answer at least one question together, students and parents. Please write the question and your answer. Do not forget to put your name and class on your work. You can submit your work to me in class or have your parents email your answers to me at: ewine@schools.nyc.gov

Option 2 Keith Haring Web Page Study: Visit Keith Haring's webpage created specifically for children. Explore the different sections on this interactive site including books, activities and art. Write two or three sentences to share something new that you learned about Haring or his art. Do not forget to put your name and class on your work. You can submit the responses to me in class or have your parents email them to: ewine@schools.nyc.gov
Click here: Haring Kids
Option 3 Keith Haring Video and Drawing or Painting: Continue to practice drawing figures in action on your own at home. Color your artworks with the medium of your choice: crayon, marker, colored pencil, or even paint. Don't forget to sign your name and class on the back. Bring your practice drawings to class.
Watch this video to help remind you of Keith Haring's style before you start drawing or painting.

LAST YEAR:
Disc Sculptures
How do artists inspire other artists?


Second grade students learned about two different artists. The first artist, Damian Ortega is a sculptor from Mexico. He often used discs, or flat circle shapes, as a theme in his work. One of his works (seen above) was created from slotted tortilla shells. The tortilla shell sculpture inspired the American artist Joel Henriques, who is from Oregon. Henriques saw Ortega's tortilla sculpture in a magazine and began creating his own slotted disc sculptures from collage discs he had made.
Choose an option below to explore the idea of building sculptures at home.
Option 1 Class Power Point Review: View the Power Point using the link below to review what we learned in class. Answer at least one question together, students and parents. Please write the question and your answer. Do not forget to put your name and class on your work. You can submit your work to me in class or have your parents email your answers to me at: ellen.wine@ps150q.org
Option 2: Build a Disc Sculpture with Geometric Shapes: Discs,, or circles, are just one geometric shape. How could you create a sculpture by slotting other shapes? Get a piece of recycled cardboard (like an empty tissue box or empty cereal box) and cut out some geometric shapes. You could cut the same shape over and over or you could cut different shapes. Cut slots in each shape. Add designs to the empty side of the paper if you wish. Slide the slots of each piece together and create a sculpture. Take a photo of your work an email it to me at ellen.wine@ps150q.org

Option 3: Building Sculptures with Toys: Many different kinds of toys can be used to create sculptures. The artist Joel Henriques used the slotting method to create animal toys for his own kids. What kinds of toys do you have at home that you could use to build things? Do you have blocks? Legos? Kinnex? Use your toys and create a sculpture. It could look like a real object or it could be just a 3-D design. Take a photo of your sculpture and send it to me at ellen.wine@ps150q.org

PREVIOUS YEARS:
REMOTE LEARNING:
Georgia O'Keeffe Drawing Project
Classes 2 - 327, 2 - 329, and 2 - 325
Georgia O'Keeffe Drawing Project
Classes 2 - 327, 2 - 329, and 2 - 325

Hello Families!! This page will have the same activities I posted on my Google classroom page in addition to descriptions of activities we would have actually done in art class. I will post a new activity each week, but there will be extra "enrichment" ideas below as well. If you have any questions, please reach out to me via my school email at ewine@schools.nyc.gov
April 6: This week you will practice sketching using "thumbnails." A thumbnail is a small sketch where an artist tries out their ideas.
1. Watch my YouTube video to see a demonstration of drawing a flower with "cropped" edges and details.
2. Look at this Power Point for pictures of flowers I took on a walk through the neighborhood here in Sunnyside. Choose 4 flowers to draw. Or you can always work from your own pictures or real flowers you can see.
3. Take a photo of your drawings and email them to me at ellen.wine@ps150q.org
March 30: This week we will practice blending colors. You can blend colors best with either crayons or colored pencils. You can find a coloring book page to practice blending colors on or you can draw your own picture and blend colors.
1 Watch my YouTube video demonstration on color blending with warm and cool colors.
2. Practice on your own. If you need a flower to color check out these printable pages from the New York Botanical Gardens. Take a photo of the picture you blended colors on and email it to me at ewine@schools.nyc.gov
Week of March 23:
Review what we learned about the American artist Georgia O'Keeffe and look at some examples of her work.
1. Watch this YouTube video of the story we read aloud in class.
2. Read the information about Georgia O'Keeffe from our class handout and look at a few examples of her flower paintings on the Power Point link. Discuss what you see and learn as a family.
3. On loose leaf, list 3 important things you learned about Georgia O'Keeffe and her work. Please remember to put your name and class on your work. You may photograph your response (with a smartphone) and email the picture of your work to Mrs. Wine at ewine@schools.nyc.gov
Above all, stay safe, have fun, and I will see you next week!!
In Class Activities and Enrichment:
Second grade students are studying the art of American artist Georgia O'Keeffe. Students will examine the art of Georgia O'Keeffe to learn how she zoomed in and abstracted flowers when she painted them. Then each student will create an original drawing in the style of Georgia O'Keeffe using oil pastels. Drawings will focus on zooming in on details, cropping flowers, and blending colors.
Choose an option below to explore more about Georgia O'Keeffe. Complete the activity and give it to Mrs. Wine to earn bonus points toward your art grade!!!

Option 1: View the Power Point using the link below to review what we learned in class. Choose your favorite O'Keeffe flower from the Power Point. Write 2 - 4 sentences to describe how O'Keeffe blended warm and cool colors in the painting you chose. Do not forget to put your name and class on your work. You can submit your work to me in class or have your parents email your answers to me at: ewine@schools.nyc.gov
Option 2: O'Keeffe also created paintings of New York City. Look at these images of Georgia O'Keeffe's cityscapes. Draw your own cityscape inspired by O'Keeffe. Bring your drawing to art class or have a parent help you photograph your drawing (with a smartphone) and email me your drawing for extra credit at ewine@schools.nyc.gov


Option 3: Watch these two YouTube videos. The first is 4 minute video that shows the landscape from the area O'Keeffe lived in New Mexico. The second is a 360 video (scroll around each scene as the video plays for different viewpoints) created for an O'Keeffe exhibit at the Tate museum in London, England.
Respond to what you saw in these videos in any way you choose. You could draw or paint a picture, write a description, or write a poem. Bring your response to Mrs. Wine in class or have a parent take a photo of it (with a smartphone) and email to me at ewine@schools.nyc.gov
Vincent van Gogh Inspired
Starry Night Drawing
Class 2-327

Students in the second grade TAG class are working on a special drawing inspired by the famous Dutch painter Vincent van Gogh. They discussed how artists use the element of space to create depth in a landscape drawing. They learned vocabulary words including foreground, middle ground, background, and overlap. They worked with a partner to identify each of these vocabulary words in a painting by van Gogh. Students also discussed how the style of van Gogh's sky in Starry Night is filled with lines that appear dashed or "feathered" and create a sense of movement by following curved and spiral paths.
Students are sketching ideas for landscapes and using the vocabulary we discussed in class to create a sense of depth in their drawings. They will practice adding color and creating movement with dashes of color. Final drawings will be completed on black construction paper with construction paper crayons. Students will be working on this drawing in their classroom with Mrs. Wine when the older students are taking the state exams this spring.
Look below for EXTRA CREDIT OPPORTUNITIES:
Option 1: Look at Class Power Point

Look at the paintings on slides 1 - 8 together as a family. Which of these paintings is your favorite? Why do you like it? What do you think the artist van Gogh is trying to express in this painting? Students can write a short paragraph on loose leaf that describes their favorite painting and explains their thinking. Students should place their name and class on the paragraph and submit it to Mrs. Wine the next time they have art class.
Option 2: Bring an original image or sketch to help inspire your drawing.
In class we discovered how other artists had borrowed van Gogh's idea to create their own Starry Night inspired artwork. Students can bring a photo of a landscape or cityscape to work from as they sketch. They could include their favorite fictional place for a unique idea. If students cannot bring the image, they can make a sketch and bring their drawing to work from in class.


Josef Albers:
Painting with Tints and Shades

Second grade students are studying the art of German born painter Josef Albers. Students examined his abstract paintings and discussed how he used geometric shapes (especially squares) and different values of color. Students selected one color for their painting and learned to make tints of that color (by mixing the color with white) and how to make shades of that color (by mixing the color with black). Students will create a design using their three tempera paintings of different values and glue them together.
Choose an option below to explore more about of Josef Albers and value. Completed activities will earn extra credit towards students' art grades.
Home LInk Option 1:
Look at the Power Point on Josef Albers we viewed in class. Choose one slide to focus on. Answer the question on that slide on loose leaf paper. Write your answer in complete sentences. Make sure you include capital letters and periods. Use art vocabulary in your answer. Write your name and class at the top of your response and give it to Mrs. Wine during your next art class.
Home Link Option 2:
Create your own monochromatic design. Create a design and draw it in black crayon or Sharpie marker. You may: 1) Repeat one shape over and over. 2) Repeat and overlap different geometric and/or organic shapes. 3) Draw some straight and/or curved lines to fill your page. (See the examples below) Use a variety of values of one color to add color to your design using crayons. You may either use different crayons that are the same color, but different values (light blue, regular blue, navy blue). You may also press harder to make crayon colors darker and press softer to make crayons colors lighter. Color neatly by staying inside the lines and coloring all the "peek-a-boo" spaces. Place your name and class on the the back of your value drawing and give it to Mrs. Wine at the beginning of your next art class.


Home Link Option 3:
Josef Albers created hundreds of paintings of squares. Create your own artwork using only the square shape. You may make your artwork just a design full of squares. You may make squares of different sizes. You may put your squares together to make them look like something (like a square robot or square house). Add color to your square artwork using crayon, marker, colored pencil, collage, paint, or even art on your computer. Place your name and class on the back of your square artwork and give it to Mrs. Wine during your next art class.


Art Expo Second Grade


Paul Klee Emotional Line Project

Second grade students are studying the art of Swiss born artist Paul Klee. Students looked at many of examples of Klee's abstract works that focused on the art elements of line and color. Students are making small sketches where they are using different lines and colors to express feelings. Students will enlarge their favorite sketch and revise it to create a final emotional line drawing. Then students will work with a similar composition to create an emotional line painting. At the end of the lesson, students will compare and contrast their two artworks.
Choose one of the options below to extend your knowledge of Paul Klee and his work. Select an activity to complete and earn bonus points toward your art grade.
Option 1: View the Power Point presentation we discussed in class.
Sit together, parent and art student, and examine this power point presentation we looked at in class. Discuss the images you see in terms of Klee's use of line and color. Answer one of the questions from the presentation together. Make sure you include which slide number you were looking at as well as the question. Answers may be written on loose leaf and turned in to Mrs. Wine during art class or may be typed and submitted via email to ewine@schools.nyc.gov.
Option 2: Draw a Klee inspired doodle to music.
Paul Klee loved music. His father was a violinist, so he was surrounded by music from the time he was a small child. His favorite composers were Johann Sebastian Bach and Wolfgang Amadeus Mozart. Not only were many artworks that Klee created influenced by his love of music, such as the blue painting "Heroic Fiddling" seen below. Several musicians have composed musical pieces in response to Klee's paintings.
Play a piece of music that your family enjoys listening to. Place your pencil, crayon, or marker on the paper and let your dot go for a walk. (Remember Klee's quote, "A line is a dot that went for a walk.") Draw a few lines in the style of Paul Klee inspired by the music you are listening to. Add some color to complete the artwork. Place your name and class on the back and give the drawing to Mrs. Wine.

Option 3: Draw an animal in the style of Paul Klee.
Ones of Paul Klee's most famous paintings is the "Cat and Bird" painting seen below. Notice how he uses very simple lines to show the animals. Create your own simple drawing of your favorite animal. Add color in the medium of your choice such as crayon, marker, or colored pencil. Place your name and class on the back of your drawing and turn it in to Mrs. Wine.
.jpg)
African Culture Arts
Class 2-329
Adinkra Prints

Students in class 2-329 are studying the art of adinrka printed cloth from West Africa. Students created an abstract symbol based on an object in nature. Symbols were drawn and cut from foam and applied to a cardboard backing. Students will choose to work alone or with a partner to a stamp pattern inspired by adinkra cloth.
Look below for extra credit opportunities.
Option 1: Review class Power Point
View the Power Point presentation we looked at in class. Answer one of the questions on the slides on loose leaf paper. Write the question and the answer. Place your name and class at the top of the paper.
Option 2: Compare adinkra cloth to kente cloth.
View the Power Point presentation from the second grade kente cloth project below. Write one paragraph that compares and contrasts the adinkra cloth designs that your class is studying to the kente cloth designs that the other classes are studying. You may choose to use a Venn diagram instead of writing in paragraph form if that helps you. Tell at least 2 ways adinkra and kente cloth designs are alike and at least 2 ways they are different.
Classes 2-324 and 2-325
Kente Cloth Designs
Kente Cloth Designs
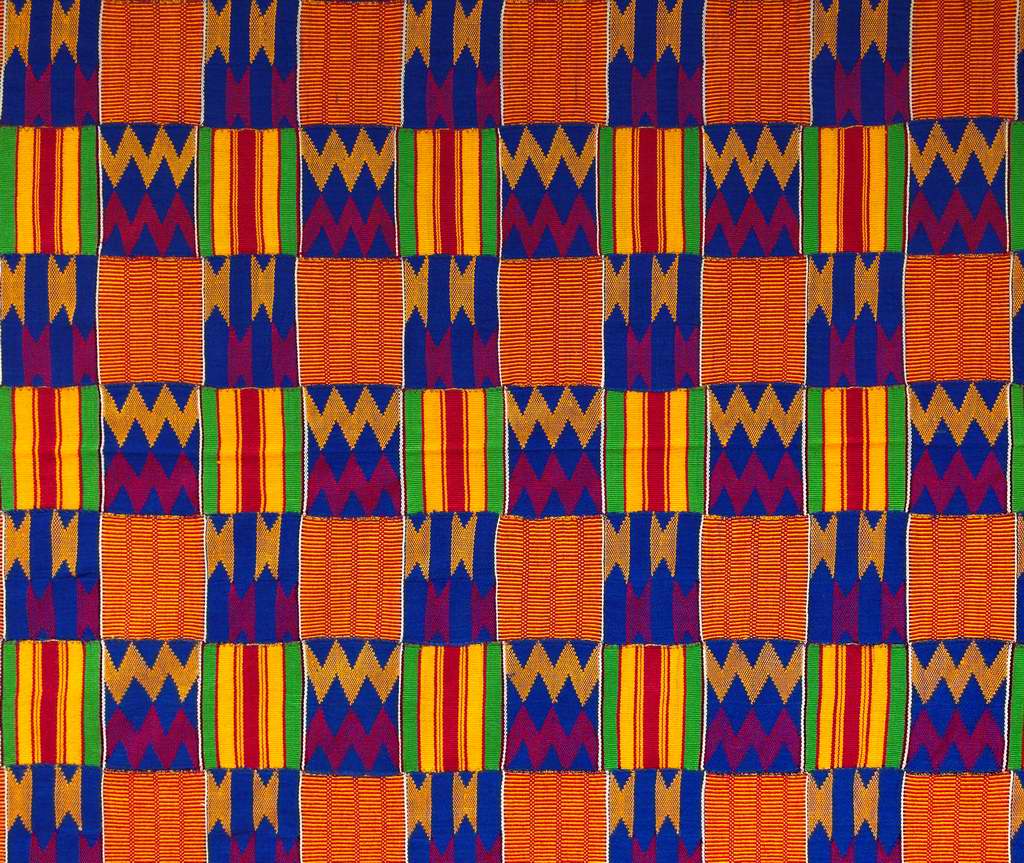
Second grade students in classes 2-325 and 2-328 are creating artworks inspired by African kente cloth patterns. Students looked at a variety of kente cloth designs created in West Africa and examined how patterns are used in this woven cloth. Students learned the different meanings in the colors used.
Students are working with a partner. Each partner is creating two color patterns using construction paper. Then students are creating stamps by wrapping yarn around cardboard to create a line and shape design. Students will apply black paint to their yarn stamps and stamp four pieces of cardboard paper each. Then students will assemble their collage and print papers together with their partner. Final artworks will mimic the look of African kente cloth.
Look below for extra credit opportunities.
Option 1: Review the class Power Point.
View the Power Point presentation we looked at in class. Answer one of the questions on the slides on loose leaf paper. Write the question and the answer. Place your name and class at the top of the paper.
Option 2: Compare adinkra cloth to kente cloth.
View the Power Point presentation from the second grade adinkra cloth project above. Write one paragraph that compares and contrasts the kente cloth designs that your class is studying to the adinkra cloth designs that the other class is studying. You may choose to use a Venn diagram instead of writing in paragraph form if that helps you. Tell at least 2 ways adinkra and kente cloth designs are alike and at least 2 ways they are different.
2nd Grade TAG Homework Extension
2nd Grade TAG students in Mrs. Matura's class are working on a special Keith Haring collaboration project in class. Each student in the class began a final drawing in class and should have brought it home with the direction sheet attached. Click below to view the Homework Extension Power Point that we looked at in class. It includes samples of the homework project as well as project directions. The homework sheet is also accessible below (in case some students lost the one given to them in class).


Students in class 2-327 are doing a collaborative project that is an extension of a social studies unit from their regular classroom. Students discussed the idea of community in their regular class. They took a neighborhood walk and took their own photos of the community around our school.
In art class, students looked at the works of Romare Bearden, especially his collage called The Block which can be seen in the Metropolitan Museum of Art. Students learned about the life and work of Bearden. They examined how he pieced together collages inspired by the Harlem neighborhood in which he lived.
Students worked from photographs, both those they had taken on their neighborhood walk and some provided by Mrs. Wine. Students drew from observation. They discussed the concept of "artistic license" and revised their drawings, in some cases combining ideas from two different photos. Each student engraved their image of a building or important structure in the Sunnyside community on a styrofoam plate.
Parent volunteers will help students as they create two relief prints of their print. Students will get to choose the color ink they use as well as the color of paper they print on. Then students will work collaboratively with their table groups to create a collage using their prints and other papers. Finally, all collages will be assembled to create a unique artwork about our community.
Look below for extra credit opportunities.
Option 1: Review Class Power Point
Review the Power Point we viewed in class. Answer 2 of the questions on loose leaf paper. Make sure you write the question as well as your response. Place you name and class on top of the paper and turn it in during your next art class.
Option 2: Collage People for Your Group's Collage
Romare Bearden pieced together people in his collages by using magazine and newspaper photos. These collage people looked very interesting because the features of the face (eyes, nose, mouth, etc.) did not match the head.
Use newspapers and magazines from home to piece together some people to use in your group's collage. Put heads on different bodies. Add arms and legs from other photos. Cut out eyes, noses, and mouths and layer them on top.
Bring your collage people into class to add to your group's collage of Sunnyside.

No comments:
Post a Comment