The Dot: Exploring Art Media

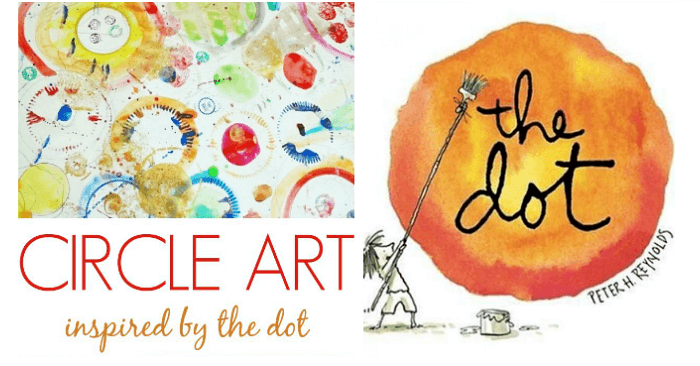


Students in Mrs. Wine's first grade art classes are beginning the year with an exploration of art materials centered around the book The Dot by Peter H. Reynolds. This book tells the story of a student who did not like art but was encouraged by her art teacher to begin by just making a mark.
As the student begins to gain confidence her work as a student artist continues to grow. She in turn, learns to encourage other student artists.
Students will use this theme of simply making a dot to explore their ideas around the simple idea of a dot or circle using different media.
Home Link 1: Help your student create their own "Dot" artwork at home. Begin with a dot (small, medium, or large) somewhere on a sheet of paper. Ask everyone in the family to help by add on other dots and/or circles of their own. Use crayon, marker, colored pencil or paint. You can even combine materials. Have your student sign their name and class on the back and bring the artwork to school to share with the class.
Home Link 2: Watch the video clip of The Dot using the link below. Discuss with your child how Vashti, the student, felt at the beginning of the story compared to the end of the story. How did her feelings about art change? Why do you think they changed? How was Vashti able to influence others?
Home LInk 3: Have your child make his or her own artworks using just one simple shape or type of line. They can continue exploring the idea of a dot or can choose another line or shape. Have your student write his or her name on the back of their artwork(s) and bring them to class for extra credit.
OTHER LESSONS:
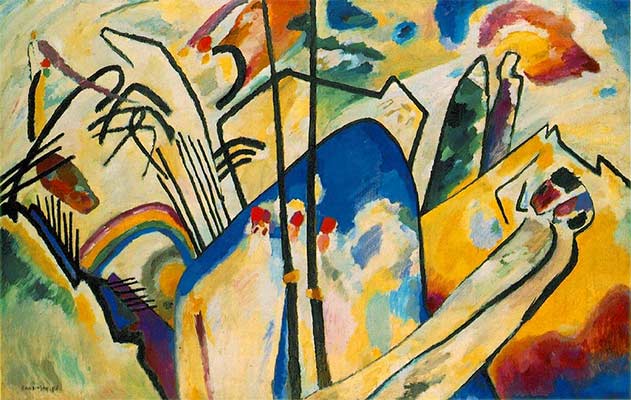
Kandinsky Inspired Abstract Art

Students in looked at examples of the abstract paintings of Wassily Kandinsky. They described what they saw using the elements of art (line, shape, and color). Students listened to the book "The Noisy Paintbox" to learn about the life of Kandinsky. He was thought to have synesthesia, a neurological disorder where experiencing one sense in the body stimulates another sense. For example, when Kandinsky painted he actually heard sounds; when he listened to music, he actually saw color. This disorder helped lead Kandinsky to become an early pioneer of abstract art. Students looked at several of Kandinsky's paintings on a Power Point slide. Students will be working abstractly to create drawings and paintings by listening to the same composers Kandinsky loved, such as Richard Wagner. Look below for learning activities you can do at home to enhance and enrich student learning in this unit.
Home Link 1: Look at Kandinsky Power Point
Look at the Kandinsky's paintings that we viewed in class. Some of Kandinsky's abstract paintings use mostly geometric shapes (such as circles, triangles, and squares) and straight lines. Others use mostly areas of color, organic shapes, and curved lines. Discuss with your child which style he/she likes better and why. Help your artist write 2 - 5 sentences to describe which style of Kandinsky's paintings they like better and to explain why. Encourage them to use art vocabulary (abstract, geometric, organic, etc).
Home Link 2: Draw or Paint to Your Favorite Music
Kandinsky's favorite composers were Richard Wagner and Arnold Schonberg. What kind of music does your family like to listen to? Play some of your favorite music and create an abstract drawing or painting to this music. You could work with your son/daughter to create one artwork or you could each create one of your own and then compare them. Have your artist place his/her name and class on the back of the artwork and bring it to Mrs. Wine so we can share this family art in class.
This is the Power Point that outlines our art making activities for each day of the unit.
Kandinsky Unit Overview
Follow along to see what we are learning in class.
This is the Power Point that outlines our art making activities for each day of the unit.
Kandinsky Unit Overview
Follow along to see what we are learning in class.
Art Inspired by Yayoi Kusama

Yayoi Kusama is a Japanese born contemporary artist. She lived in New York in the late 1950s through early 1970s where she was influenced by Abstract Expressionism and Pop Art. She works primarily in sculpture and installations. In addition she creates paintings, fashion, films, and poetry. Students listened to a story about Kusama and looked at images created by Kusama. Students discussed the shapes they could use to draw objects inspired by nature and sketched large objects using these shapes. Students will select a color for their background and use a contrasting construction paper crayon to create background filled with straight or curved line connected shapes. Students will a collage of their nature inspired object using 1-2 colors of construction paper. They will dots of different sizes in the style of Kusama using black tempera paint and q-tips.

Home LInk Option 1:
View the Power Point presentation the students looked at in class. Discuss how Kusama created her art of objects inspired by nature using simple shapes. Basic shapes we discussed in class that we see in her her works include ovals, circles, rectangles, and triangles.
Home LInk Option 2:
One of the images Kusama is most well known for is her pumpkin series. Get a pumpkin and paint it at home. Use some type of dot design inspired by Kusama to paint your pumpkin.

Matisse Inspired Collage
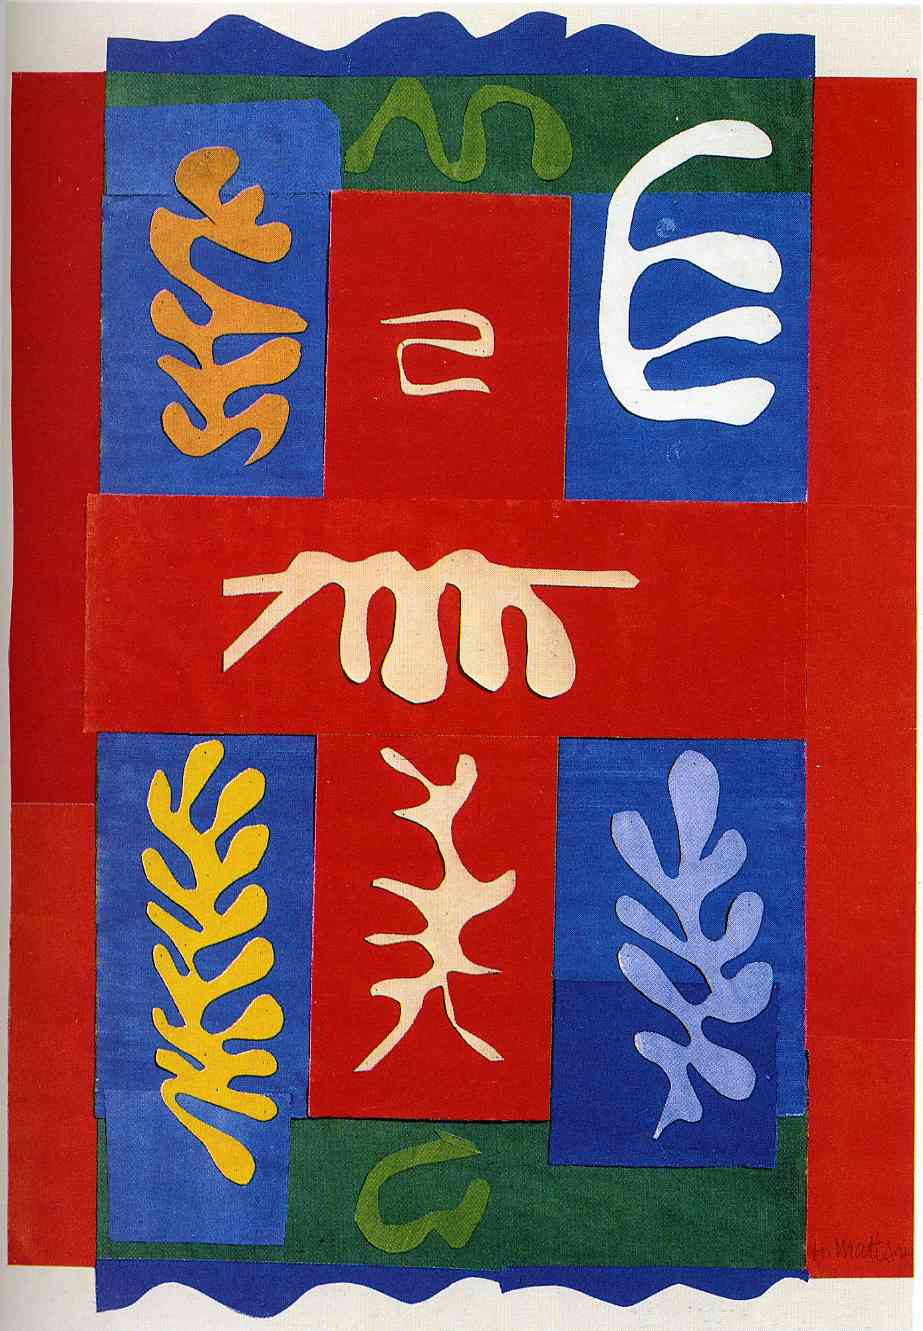

First grade students are studying the paper cutouts of French artist Henri Matisse. Students listened to stories about Matisse including Matisse's Garden and observed how he used both organic and geometric shapes in his collages. Students are creating practice collages and learning to use the positive space shape (the inside shape) and the negative space shape (the outside shape that is usually considered scraps). Students are also learning how go cut many different geometric shapes from one piece of paper while creating as little scraps as possible. Some classes are creating more abstract collages based on Matisse's garden collages while other classes are creating collages with people.
Look below to discover ways you can help your child practice observing and working like Matisse and earn bonus points for their art grade.
Home Link 1: Watch this video about Matisse!!
Practice cutting organic shapes like we did in class. Take a sheet of colored paper and cut out organic shapes. Think of the objects in nature that Matisse liked to cut out like birds, fish, leaves, and flowers. Glue the shapes and the "negative space shapes" (the leftover scraps) to a white or different colored sheet of paper. Write your name and class on the back of your collage and bring it to class.
Leaf Man Inspired Painting
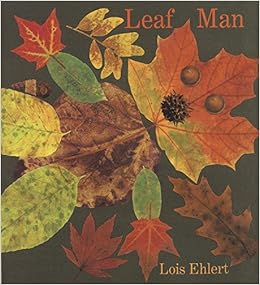
First grade students explored the leaf collage illustrations in Lois Ehlert's book Leaf Man. They selected a leaf template and traced it on their paper then added their own lines to show the veins of the leaf. Students learned about warm (red, orange, and yellow) and cool (green, blue, and violet) color schemes. Students used the "wet on wet" watercolor technique to paint their leaves with washes of warm colors and their background with washes of cool colors.
Examine the sample illustration from Leaf Man below and discuss it along with the cover illustration seen above together as a family. Complete the project extension to earn bonus points toward your art grade.

This is the Power Point that we look at each day in class. Follow along with the lesson to see what we are learning!!
Home Link 1: Collect some different fall leaves and press them in a book for a few days. Arrange the leaves on a sheet of paper to create a collage. Experiment with how you could put different leaf shapes together to create your own unique picture. Glue the leaves down to your paper. (If the leaves are too dry and crackly, they could be traced onto construction paper and cut out. The cut paper leaves could then be used to create the picture collage.)
Write your name and class on the back of the paper and submit it to Mrs. Wine in art class.

Home LInk 2: Collect some leaves. Place different leaves under a sheet of white copy paper and use a crayon to create a leaf rubbing. Use different colors to trace around the edge of the leaves. Discuss the different parts of the leaf (stem and veins) as the rubbings are completed. Have your child place his/her name and class on the back of the leaf rubbing art work and bring it to Mrs. Wine during their next art class.


Become a Creative Family!!! Watch this YouTube video interview with author and illustrator Lois Ehlert. Think about how you could help create a "creative spot" for your child to write or draw. I know that New York city apartments and houses can be short on space, but this interview points out the importance of allowing your child the space to create!!

The Giving Tree Inspired Painting

First grade students listened to the story The Giving Tree and discussed the different parts of a tree described in the story. Students then practiced drawing a tree with no leaves (trunk and branches only) using the "Y" technique. Start with a large letter Y for the trunk and large branches. Then keep attaching smaller Ys to create the small branches. Students will experiment with both warm and cool color schemes to use watercolor to create a background for their tree painting. Then students will use black tempera paint and the Y technique to create a tree painting.
Follow along with the day by day lessons here on this Power Point
Tree Painting Power Point
Follow along with the day by day lessons here on this Power Point
Tree Painting Power Point
Home LInk 1: Ask your child to teach you how to use the Y technique to draw a tree with no leaves. Turn in the drawing of the tree you created with your son/daughter's name and class on the back and they will earn extra credit.

Home Link 2: Have your child create a drawing of a tree with no leaves. They should add details to show what is near their tree and in the background. They could include people, buildings, and/or animals. Drawings may be colored neatly or may be simple pencil drawings. Have your son/daughter put their name on the back of the drawing along with their class and submit it to me for extra credit.
Home Link 3: Look at one of the activities from the "Leaf Man" painting project that the other first grades are doing. These two projects are linked in that the theme is using warm and cool colors to create a fall painting inspired by nature. Your student may create the leaf collage or the leaf rubbing. Talk about the different parts of a leaf and of a tree to reinforce their learning. Artworks should be given to Mrs. Wine with the student's name and class on the back.
Home Link 3: Look at one of the activities from the "Leaf Man" painting project that the other first grades are doing. These two projects are linked in that the theme is using warm and cool colors to create a fall painting inspired by nature. Your student may create the leaf collage or the leaf rubbing. Talk about the different parts of a leaf and of a tree to reinforce their learning. Artworks should be given to Mrs. Wine with the student's name and class on the back.


Rainbow Fish Inspired Collage
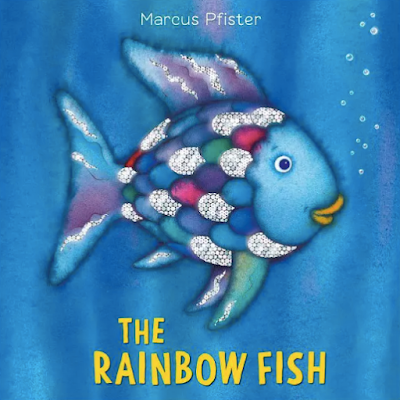
First grade students listened to a video presentation of The Rainbow Fish by Marcus Pfister and looked at illustrations from the book. They discussed what geometric shapes could be used to draw a fish: an oval for the body, triangles for the fins, and a circle for the eye. Students created a practice drawing using these shapes. They added designs to the fish body with lines.
Students are working to create a collage using fish as a theme. Students will cut and glue geometric shapes to make 2 - 3 fish. They will also cut lines from construction paper to create designs on each fish. Then seaweed, rocks, and coral will be created by cutting organic shapes. Finally, all pieces will be layered in the final collage. As a special bonus, students who can show a great deal of cooperation and who share easily with their peers will earn a bonus sparkling scale to add to their collage.
Look below to find extra credit opportunities.
Option 1:
Watch the same video clip that we watched in class. Help your child write down 2 - 3 things they can do in class to be like Rainbow Fish at the end of the story. How can they share and make others happy? How will that make them feel? Help your child record his/her responses on loose leaf. Place child's name and class at the top and return to art class.
Option 2:
Practice drawing an underwater scene at home. Fill the page with fish. Make sure the page is balanced. Color neatly to finish the artwork. Place student's name and class on the back and return the drawing to art class.
Louise Nevelson Sculptures

Students looked at the box assemblage sculptures of artist Louise Nevelson. The learned how she re-used pieces from sculptures she did not sell and recycled other items into her sculptures. Students are working with a partner to build a shallow box sculpture from wood and recycled objects. Students will arrange their objects to fill the box and create interesting layers. Then students will paint everything in their box with one color. Box sculptures will be assembled into one class sculpture by Mrs. Wine and will be exhibited during the school's annual Art Expo on May 31.
Look at the Power Point on Louise Nevelson as a family together. Have your child discuss what shapes they see. What types of other objects can you notice.
Students in some first grade classes studied the artist Piet Mondrian. They looked at how his work changed over time from realistic to abstract. Students observed how his abstract works use primary colors (red, yellow, and blue) along with black and white and only have squares and rectangles in them. Students created a practice sketch of an abstract drawing in Mondrian's style. Students will use tempera paint to create a painting based on their sketches. Look below for activities you can do at home to enhance and extend learning for this unit.
Home Link 1: Watch this Mondrian Video
Watch the video on the first slide of this presentation that we will be watching in class as a part of this unit. Discuss as a family which type of Mondrian paintings you like best and why? Do you like the more realistic trees or the abstract primary colored squares and rectangles? Help your child write 2 - 3 sentences to describe which type of Mondrian painting they like best and why. Make sure their name and class is on the paper. Have them bring it to their next class.
Home LInk 2: Using Primary Colors
Mondrian's abstract works used only the primary colors plus black and white. Color a picture from a coloring book with only primary colors or draw your own picture and use only primary colors to color it with. Use crayons, markers, or colored pencils. Remember to color in one direction and to check for "peek-a-boo" spaces. Students should place their name and class on the back of the paper and bring it to Mrs. Wine the next time they have art class.
No comments:
Post a Comment