Zentangle Landscape Painting and Drawing
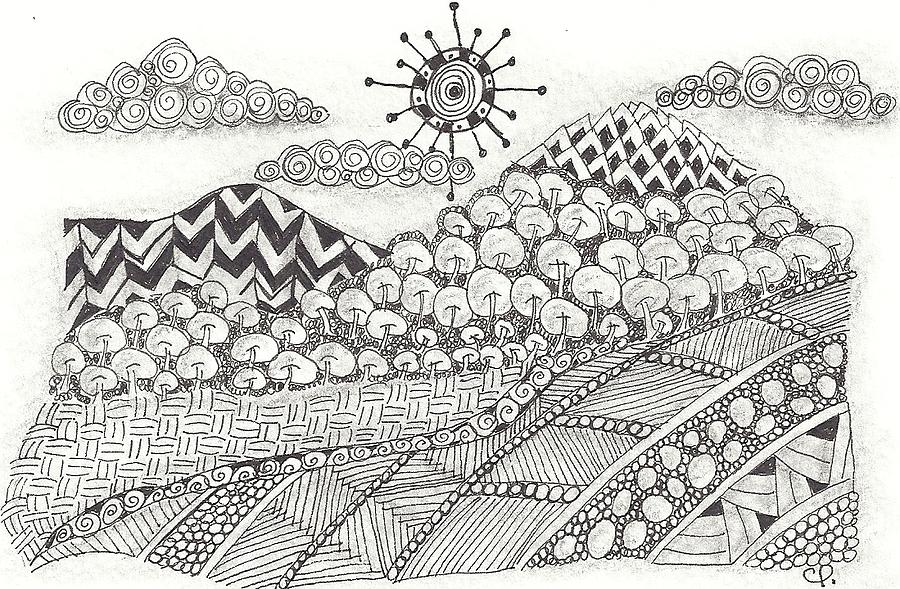
Third grade students are looking at Zentangles, a special type of doodle design developed by Massachusetts artists Maria Thomas and Rick Roberts in 2004. This new art form helps increase focus and creativity. Lines are used to create repeating patterns that seem to get “tangled” up with each other. Creating Zentangles is relaxing. It is a “zen” activity that is like artful meditation or “yoga for the mind.” Students will create their own simple landscape drawing and add Zentangle designs to make it unique. Then students will add color to their drawing with washes of watercolor paint. Complete one of the activities below and submit it to Mrs. Wine to earn extra credit points in art class.
Option 1: Review the Power Point we looked at in class together as a family. Students should be able to describe what they see in each image. Answer one of the questions from one of the slides and turn in your response for extra credit. Please make sure your name, class number and the question are on you paper. Students may also submit their response via email to ewine@schools.nyc.gov
Option 2: Create a Zentangle design that has a different subject, not a landscape. You may use an animal, object from nature, food item, or just basic letters or shapes as your inspiration. Draw the basic shape of the object first. Then add a few lines to divide the object into different sections. Finally, add Zentangle patterns. You may use one color or many colors for your designs. Look at the examples below to help you get an idea. Parents and students may work on this together!!! Turn in your drawing to Mrs. Wine with your name and class on the back.


Option 3: Write your name in block or bubble letters. Ask an older student or adult to help you write the letters if you need help. Divide each letter into 3 - 4 sections. Draw Zentangle patterns to fill each section of each letter. Use different line and different shapes to create your patterns. Work to make different values with your designs. Place your name and class on the back of the drawing and give it to Mrs. Wine in class to earn extra credit.

PAST YEARS:
Class 3-319 and 3-217
NYC Skyline Prints


 James Rizzi Inspired Cityscape Power Point


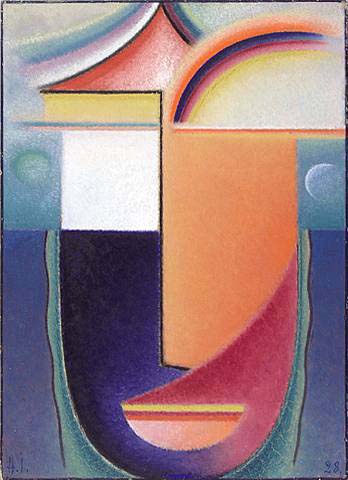
Abstract Faces of Alexej von Jawlensky
Classes 3-219, 3-215, and 3-315
NYC Skyline Prints
Week of April 6: This week you will have a choice of cityscape inspired projects. Both will require a lot of imagination!! Click each Power Point below the image to learn more about your choices.
Choice 1: Cityscape of the Future.

Choice 2: James Rizzi Inspired Cityscape

Decide which type of cityscape you want to create!! Use your imagination and fill your page.
Take a photo of your work and email it to me at ellen.wine@ps150q.org
Week of March 30: Create a drawing of your neighborhood. William H. Johnson was inspired by his Harlem neighborhood and by where he grew up in South Carolina.
1. Watch this video of how this YouTube artist draws a neighborhood.
2. Look out your window. If you are out for a walk look at the buildings you see. What shapes make them unique? Pay close attention to windows, doors, and the overall shape of the building. Look at this Architectural Hunt page to help you get ideas.

3. Draw your neighborhood. You could draw just 1 or 2 buildings or draw several. Work to fill your page. Add color if you want. Take a photo of your drawing and email it to Mrs. Wine at ewine@schools.nyc.gov
Week of March 23:
Review what we learned about the African American artist William H. Johnson and look at some examples of his work.
1. Read the information from the project handout and look at the images on the Power Point we viewed in class.
2. Write three important facts you learned about William H. Johnson and his work. You may type your answer on a computer or write it on loose leaf and have a parent take a photo of it (on a smartphone). Email your response to me at ewine@schools.nyc.gov
Above all, stay safe, have fun, and see you next week.
In Class Activities:
Band and Chorus Students: Look at the Option 1 Power Point for your introduction to this unit. Then look at the "Weekly Lesson" Power Point to find your step by step lessons for this project. You are encouraged to submit your sketches to me for feedback prior to beginning engraving your foam plate.. Final projects may be submitted for consideration in this year's Art Expo in May.
Materials List:
You will need to provide pencils for sketching, watercolor paints to paint your background (or see me to check out a used set from the classroom), and a ball point pen.
I will provide sketching paper, final watercolor sheet for painting and printing, and a foam plate to engrave your image. At the end of the project we will work out a time that you may come to the art room to print your image.
Project Overview: Students in class 3-319 and 3-217 are working on a mixed media printmaking unit. They began by looking at relief prints by African American artist William H. Johnson. They read about Johnson's life and looked at examples of his work. They also looked at how other artists have created relief prints using the New York City skyline as a theme. If you are in band or chorus look at the introductory Power Point under Option 1 to see what we learned in class. Then look at the Power Point below for step by step directions each week to complete your project. If you have questions you may stop by the art room or ask your parents to message Mrs. Wine on DoJo or email Mrs. Wine at ewine@schools.nyc.gov
The link for the foam engraving video is:
The link for the relief printing demonstration can be found under extra credit Option 3.
Students will sketch the NYC skyline from observation using different images. Then students will decide on a color theme for their background. Backgrounds will be painting using washes of watercolor paints. Students will work from their sketches to engrave foam plates with their NYC skyline. Finally, students will create their relief prints using black printing ink on their background. Look below for opportunities to enrich student learning during this unit.
Enrichment Activities:
Option 1: View Power Point
Look at the Power Point we viewed in class together as a family. Answer one of the questions from the Power Point on a sheet of loose leaf. Submit your response to Mrs. Wine in class. Make sure you include the question, name, and class.
Option 2: Sketching a New York City Building or Landmark
Find a photo of a famous New York City building or landmark. Create a drawing of this building. Fill your page. Add details that make this building or landmark unique. Use any drawing material you would like such as pencil, colored pencil, pen, crayon, or marker. Write your name and class on the back of this drawing and give it to Mrs. Wine in class.
(Mrs. Wine's mom was born in Brooklyn. This is a photo of the Brooklyn Bridge)
Option 3: Watch YouTube Video About Printing
Watch this five minute video about how to create a foam print. Make a list of vocabulary that you learned about while watching this video. Write a short definition of each vocabulary word you listed. You should be able to list 3 - 5 words.
Option 4: Watch this YouTube video to see and learn more about the life and work of William H. Johnson.
Johnson used simple shapes and bold colors to create paintings that told stories from his life. Draw or paint a picture to tell a story about your family or your life. Use simple shapes and bright colors inspired by Johnson. Write your name on the back of the artwork and bring it to class. Or you can have a parent photograph the work (with a smartphone) and email it to Mrs. Wine at ewine@schools.nyc.gov
Abstract Faces of Alexej von Jawlensky

Week of April 6: Paul Klee is another artist who worked in an abstract style. This week you will create an abstract portrait or drawing of an animal inspired by him.
1. Look at the Power Point to learn about Paul Klee and his work.
2. Want to see more? Watch this YouTube video.
3. Create your own portrait or drawing of an animal inspired by Paul Klee. Remember, you don't need to copy his work exactly. Borrow some of his ideas and chang things to make it your own.
4. Take a photo of your work and email it to me at ellen.wine@ps150q.org
Week of March 30: Alexej von Jawlensky used color in his works to express how people feel. We can usually infer how people are feeling by looking at their facial expressions. This week you will draw faces to show different feelings.
1. Look in a mirror and make some faces at yourself. Make a happy face, a sad face, and angry face, a surprised face, and a calm face. Look especially at how your mouth and eyes change as you make these faces.
2. Draw 3 faces, each one showing a different expression. You can draw all three faces on the same page. Work to add many details to the facial expression to show the feeling. Add color if you want. If you need help drawing faces, watch this YouTube video for help. Email a photo of your drawing to me at ewine@schools.nyc.gov
Week of March 23:
Review what we learned about the Russian Painter Alexej von Jawlensky and look at some examples of his work.
1. Read the information from the project handout and look at the images on the Power Point we viewed in class.
2. Write three important facts you learned about Alexej von Jawlensky and his work. You may type your answer on a computer or write it on loose leaf and have a parent take a photo of it (on a smartphone). Email your response to me at ewine@schools.nyc.gov
Above all, stay safe, have fun, and see you next week.
Third grade students are looking at the works of Russian born artist Alexej von Jawlensky. They noted how he used color in his works to show a feeling or emotion. Artists who used color in this way were called Expressionists. Students also discovered how his work became more abstract throughout his career. In this project, students will create their own abstract portraits and use chalk pastels to add color to express feelings. Complete one of the activities below and submit it to Mrs. Wine to earn extra credit points in art class.
Option 1: Review the Power Point we looked at in class together as a family. Students should be able to describe what they see in each image. Answer one of the questions from one of the slides and turn in your response for extra credit. Please make sure your name, class number and the question are on you paper. Students may also submit their response via email to ewine@schools.nyc.gov
Option 2: Compare and contrast these three works by Jawlensky. Write a paragraph describing how his work changed and developed from less abstract to more abstract. Explain how these three works are the same and how they are different. Submit your response to Mrs. Wine in class or email it to her at ewine@schools.nyc.gov. Make sure you include your name and class on your response.


Option 3: Watch this YouTube video that introduces you to some of Jawlensky's landscape paintings. Look at how the artist in the video demonstrates how he makes a landscape painting of his own inspired by Jawlensky. The video is a little over 10 minutes.
Create your own landscape drawing or painting inspired by Jawlensky. Be sure to use bright expressive colors. Think about a place from your own culture you have visited or find a photo to help inspire you. Place your name on the back of your artwork and bring it to Mrs. Wine in class. Or you may have a parent help you take a photo of your work (with a smartphone) and email it to Mrs. Wine at ewine@schools.nyc.gov
PAST YEARS....
Art Expo Third Grade


PREVIOUSLY THIS YEAR...
Claude Monet Drawing and Painting

Students in third grade classes are learning about Impressionist artist Claude Monet. Monet was a French painter who was best known for his many paintings of water lilies. Students read about Monet to learn about his life and work. They practiced drawing lotus flowers. Then they watched a video that demonstrated several different chalk pastel techniques. Students practiced these techniques and added color to their practice lily drawings. Students will create a final drawing using different techniques. Watercolor washes will be used to add the water to the artwork. (This unit is being taught by Ms. Vivian.)
Classes 3 - 215 and 3-219
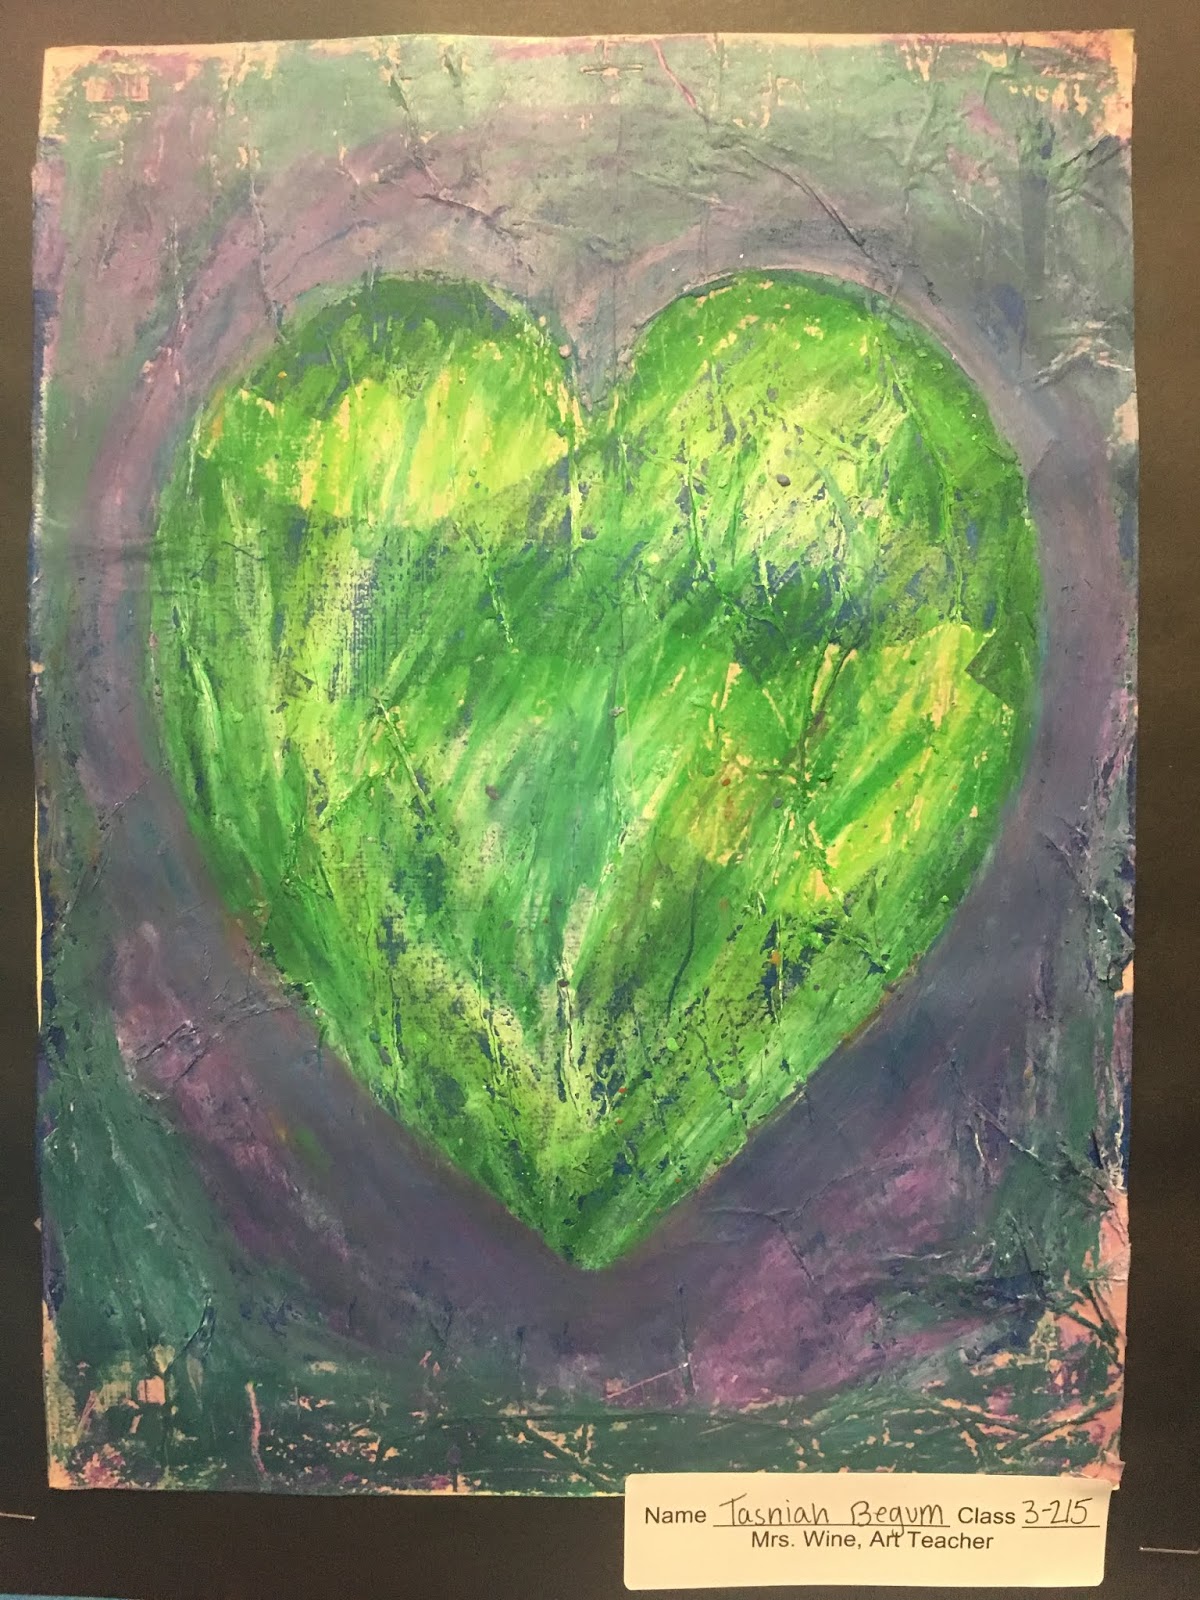
Jim Dine Inspired Mixed Media Project

Students in class 3-219 and 3-215 are working on a mixed media unit. They began by looking at some of the Heart series of works from American artist Jim Dine. They read about Dine's life and looked at examples of his work. They observed how he used the simple shape of a heart as a theme in his works.
Students will create a stencil of a simple shape such as a heart, star, or diamond shape. Then students will decide on a color theme for their textured background by selecting 2 - 3 colors of tissue paper. Backgrounds will be created by tearing tissue paper into long strips and gluing it to a piece of tagboard using diluted glue and a wide brush. Students will select 2 - 3 colors of pastels and use their negative space stencil to color inside their shapes. Students will work to blend oil pastels as they color. Finally, students will create their background by blending different colors of oil pastel for the background. Look below for opportunities to enrich student learning during this unit.
Option 1: View Power Point
Look at the Power Point we viewed in class together as a family. Answer one of the questions from the Power Point on a sheet of loose leaf. Submit your response to Mrs. Wine in class. Make sure you include the question, name, and class.
Option 2: Create Two Artworks of One Household Object
Jim Dine created series of different artworks using different subjects. In addition to his Heart series, he created works using everyday objects such as tools and bathrobes as the subject. Select 1 everyday object from your home. Create at least 2 different artworks using this object. Consider using two different materials or drawing the object from two different angles.


Classes 3-217 and 3-317
Mola Inspired Collage

Third grade students are using Mola artworks from Panama as the inspiration for a collage project. Real molas are made by Kuna Indian women from pieces of brightly colored fabric that are stitched together. The mola designs are worn on their blouses. When the women tire of the blouses they cut the mola designs out and sell them to collectors. Fish, birds, and flowers are often the subjects of molas.
Students will be creating collages inspired by the mola designs. They will sketch their animal and then begin cutting the shapes from construction paper. Color patterns will be applied to the final layer of the collage in the mola style.
Look below to find extra credit and enrichment activities.
Here is the link to the daily activities with the HW assignments for class 3-217:
Option 1: Look at Class Power Point
Look at the Power Point about mola that we viewed in class. Ask an adult to sit with you. Explain what you discussed and learned in class. Look at the pictures of mola designs on slides 1, 3, 4, and 7. Select the mola design you like best. Describe what you see using your art words. Write a description of your favorite mola in paragraph form. Turn your paragraph in to Mrs. Wine with you name and class on the back.
Option 2: Practice Drawing Animals
Find a picture of an animal or look at the pictures you were given in class. Do a detailed drawing of that animal. What are other details you could add to the background to finish the drawing and make it more interesting? Add color if you choose. Submit your drawing to Mrs. Wine with your name and class on the back.
Horizontal Animal Pictures
Classes 3-219, 3-215 and 3-315
Non-Objective Painting and Collage

Third grade students are working on a Non-Objective art unit. In this unit, students will create a Non-Objective painting using a color scheme of his/her choice. Completed paintings will be cut into squares and re-assembled into a Non-Objective collage as seen above. Students will be focusing on creating balance of line, shape, and color in both their painting and collage.
Follow along with what we are learning and doing each day in class by viewing this Power Point.
Check below for home link options that students can do to earn extra credit for this project.
Home Link Option 1: View Power Point from class.
Sit together as a family and look at this power point. Students should be able to explain the basic concepts of Non-Objective art that we have discussed in class. Answer one of the questions from the presentation in a complete paragraph. Place your name and class on top of the sheet with the paragraph and submit it to Mrs. Wine in class. OR....you may type your answer and send it to Mrs. Wine at ewine@schools.nyc.gov. Make sure to include your name and class on emailed response.
Home Link Option 2: Dice Non-Objective Drawing Game
Get a dice from a board game you have at home and a blank sheet of paper. Click on the link below and follow the directions to create your own Non-Objective drawings. Roll the dice one time to determine what type of line to draw on your paper. Roll a second time to determine what shape to draw on your paper. You may draw more than one line or shape. Continue rolling and drawing until your drawings is completed. If you have someone at home to play with you (a parent, brother, sister, or cousin), then have them roll and draw their own drawing. Compare and contrast the drawings you have done. Place your name and class on the back of your drawing and turn it in to Mrs. Wine to earn extra credit. Bring in the drawings your family and friends did too.
Home Link Option 3: Comparing and Contrasting
Watch these two YouTube videos that demonstrate different ways of making Non-Objective paintings. Compare and contrast the two ways to create Non-Objective art. Which painting technique would you like to try? Why would you like to try this way? Write your response in a paragraph for extra credit. Place your name and class on top of the sheet with the paragraph and submit it to Mrs. Wine in class. OR....you may type your answer and send it to Mrs. Wine at ewine@schools.nyc.gov. Make sure to include your name and class on emailed response. For even more fun, try making your own Non-Objective art inspired by one of these videos.
Classes 3-317 and 3-315
Gyotaku Inspired Prints

Students in class 3-317 and 3-315 are learning about the Japanese art of Gyotaku. The word Gyotaku means "fish rubbing" and was developed in Japan over 100 years ago. It was originally used to accurately measure fish, but is currently done as an art form. Students will create a background by drawing and painting. Then students will engrave a foam plate with a fish. The fish will be printed 2 - 3 times. The best relief print will be chosen, cut out, and glued onto the background.
Look below to find enrichment and extra credit options for this project.

Home LInk Option One: View Class Power Point
Sit with someone in your family and look at the Power Point we viewed in class. Explain what you learned about gyotaku in class. Look at the student examples on the last slide. Which one do you like best? Why do you think it is the best print? Write a paragraph to explain your answer. Submit your paragraph to Mrs. Wine with your name and class number on it to earn extra credit.
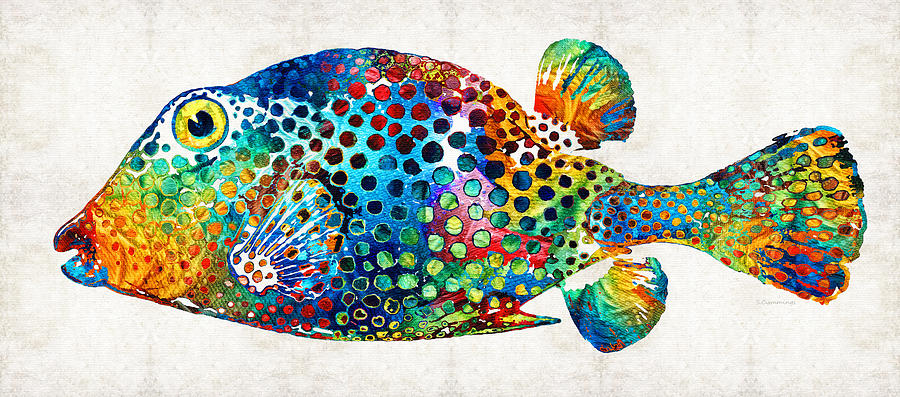
Option 2: Create Your Own Fish Themed Artwork
Look at the examples of artworks below that use fish as a theme. Create your own drawing or painting of a fish in any style you like. Submit your drawing or painting to Mrs. Wine with your name and class on the back.


Option 3: Watch YouTube Video About Relief Printing
Scroll down to option three on the project below (NYC Skyline Prints). Click the link to watch the YouTube video on relief printing. This class will be using the same process with a different theme. You may either create a list of vocabulary and definitions that you learned from watching this video. Or you may write a complete paragraph to describe how you will be making your relief print.
Class 3-319
NYC Skyline Prints
Students in class 3-319 are working on a mixed media printmaking unit. They began by looking at relief prints by African American artist William H. Johnson. They read about Johnson's life and looked at examples of his work. They also looked at how other artists have created relief prints using the New York City skyline as a theme.
Students will sketch the NYC skyline from observation using photos and postcards. Then students will decide on a color theme for their background. Backgrounds will be painting using washes of watercolor paints. Students will work from their sketches to engrave foam plates with their NYC skyline. Finally, students will create their relief prints using black printing ink on their background. Look below for opportunities to enrich student learning during this unit.
Option 1: View Power Point
Look at the Power Point we viewed in class together as a family. Answer one of the questions from the Power Point on a sheet of loose leaf. Submit your response to Mrs. Wine in class. Make sure you include the question, name, and class.
Option 2: Sketching a New York City Building or Landmark
Find a photo of a famous New York City building or landmark. Create a drawing of this building. Fill your page. Add details that make this building or landmark unique. Use any drawing material you would like such as pencil, colored pencil, pen, crayon, or marker. Write your name and class on the back of this drawing and give it to Mrs. Wine in class.
(Mrs. Wine's mom was born in Brooklyn. This is a photo of the Brooklyn Bridge)
Option 3: Watch YouTube Video About Printing
Watch this five minute video about how to create a foam print. Make a list of vocabulary that you learned about while watching this video. Write a short definition of each vocabualry word you listed. You should be able to list 3 - 5 words.
TAG Project: Paper Mache Masks

Students in the third grade TAG class are creating paper mache masks. They observed animal masks from African cultures. They read about how masks were made and learned how they are often used in different ceremonies. Students will sketch a plan for their animal mask. Students will use plastic jugs (like a 1/2 gallon or gallon milk jug) as the basic armature of their mask. They will build the rest of the armature with newspaper and cardboard. Students will cover the mask with paper mache. Then they will paint the masks, first with a dark color to cover the whole face, and then with 3 - 4 colors of their choice to add the details. Finally, students will embellish the mask with raffia grass and/or beads. Look below for extra credit options for this project.
Option 1: View the Power Point we looked at in class. Write at least one paragraph to explain something you learned about African masks. You can use the questions on the Power Point to help guide you. Place your name and class on your work and turn it in to Mrs. Wine.
Animal Mask Power Point
Animal Mask Power Point
Elements of Art Review

Third grade students are creating an Elements of Art sampler to place on the front of their art portfolio. This will help students review the elements they have learned about in previous years. It will also aid them in developing their written vocabulary as they begin to write more about their art and the art works of others.
Select an option below to complete. Submit your response to Mrs. Wine to earn bonus points for your art grade.
Option 1: Review the elements of art with a family member. Look at this power point together as a family. Students should be able to explain what they have learned about each element. Discuss the artworks on the slides. Write a short response to discuss what you learned together as a family. You may discuss your favorite artwork from the Power Point, the elements you think are most important to you, or anything new that you learned. Do not forget to put your name and class on your response. You may give your written response to Mrs. Wine in class or have your parent email it to ewine@schools.nyc.gov

Option 2: Create a drawing of anything you want on unlined paper (Copy paper is fine.). You may draw realistically, abstractly, or just make a design. On the back of the drawing explain how you used at least two - three of the elements of art in your drawing. Don't forget to write your name and class number on the back of your paper with your responses. Bring your drawing and response to Mrs. Wine for extra credit.

Hello Ms. Wine,
ReplyDeleteCan you please clarify the exact name of the reading to work on for class-3-315 only?